BEFORE YOU BEGIN
Before You Begin:
- Obtain necessary zoning and building permits. There may be local zoning or deed restrictions, or HOA rules pertaining to height and type of fence permitted in your area.
- Find surveyors pins if the fence is to be located near property lines or have the lot surveyed.
- Measure your fence footage and determine gate placement.
- Check with your local utility company to make sure that there are not any underground lines that might be disturbed.
HELPFUL TOOLS
String
Tape Measure
Post Hole Digger
Level
Come -A-long
Fence Finger (Stretcher)
Fence Pliers
Hog or Pig Ring Pliers
5/16th Socket to Tighten Bolts
Wheelbarrow, Shovel to Mix and Transport concrete
Picket Man’s Chainlink Fence Shopping Supply List
| LINE POST (Intermediate Post) | See Line Spacing Chart | |
| TENSION BAND | For each end post, use 3 for 31 Vh’ and 4′ 4 each for 5′ and 6.’Same for gate posts.
Double the quantity for corner posts. |
|
| BRACE BAND | 1 for each rail end | |
| 5/16″ x 1V»” CARRIAGE BOLT | 1 for each brace band1 for each tension band | |
| POST CAP | 1 for each terminal post | |
| EYE-TOP | 1 for each line post | |
| TOP RAIL, plain or swedged end | Same lineal footage as fence fabric | |
| RAIL-END | 1 for each end post1 for each gate post
2 for each corner post |
|
| TOP RAIL SLEEVE | 1 for each length of plain end top rail.Not needed for swedged end top rail | |
| TENSION BAR | 1 for each end post1 for each gate post
2 for each corner post |
|
| FENCE FABRIC | Same linear footage | |
| TIE WIRES | 1 for every 24″ of top rail and1 for every 12″ of line posts | |
| DOUBLE DRIVE GATE | As required | |
| SINGLE WALK GATE | As required | |
| POST HINGE (Male Hinge) | 2 for single walk gate4 for double drive gate | |
| 3/8″ x 3″ CARRIAGE BOLT | 1 for each post hinge | |
| GATE HINGE {Female Hinge) | 2 for single walk gate4 for double drive gate | |
| 3/8″ x 1 3/4″ CARRIAGE BOLT | 1 for each frame hinge | |
| FORK LATCH | 1 for each walk gate |
STEP 1
SETTING YOUR TERMINAL POSTS
1. Your property line will help determine the location of the corner, gate and end posts.
2. Dig your post holes using an auger or hand digger. The depth of your post holes will be determined by your local soil and weather conditions. ( In the North Texas area, the terminal post hole should be 6-8″ in diameter and a minimum of 24″ deep. )
3. Set all terminal posts in concrete.
4. Use a level to insure posts are plumb on all sides.
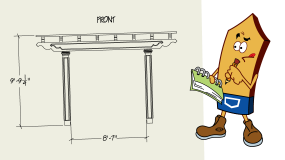
5. See fig. ? to determine the height ground to top
STEP 2
SETTING YOUR GATE POSTS
1. Gates come in many standard widths: 39″ – 48″ – 60″ – 72″ Single and Double Drive.
2. Fence Supply Inc is your one stop shop for all your gate needs!
3. The gates make the adjustments to account for the latch and hinges.
4. When setting your gate post measure the inside to inside of the each post.
Example: If you want a 4′ gate, set the post 4′ apart – Measuring from the inside of one post to the inside of the other post.
STEP 3
SETTING YOUR LINE POSTS
1. Pull a taut string line on the outside of the terminal posts measuring the distance between terminal posts
2. Mark ground for line posts-anywhere between 8′ – 10′ apart along the string line.
3. Dig your hole 6-8″ wide with a minimum depth of 18″.
4. Before concrete sets, adjust post height by carefully moving post up or down in footing. See “Height to set Post Chart” for precise measurements.
STEP 4
ADDING FITTINGS TO TERMINAL POSTS
(Refer to parts list for quantities needed)
IMPORTANT NOTE: Concrete footings must be hardened before proceeding to fittings
1. Slip single tension bands (STB) -with the long flat surface facing towards the outside or wire side of fence – onto the terminal post.
2. Add brace bands if using rail ends.
3. Place cap on top of post
STEP 5
ADDING TOP RAIL
1. Place line top cap on each line post. Offset should face outside of post.
2. Thread length of top rail pipe through the line-tops on the line posts adjacent to terminal post.
3. Attach top rail to terminal post using a RT cap OR rail end and single brace band (SBB).
4. Using a band bolt, attach the single brace band to rail end securing it around the terminal post.
5. Continue by attaching the swedge ends of top rail together until desired length has been reached.
6. If top rail IS NOT swedged, join top rail lengths using a top rail sleeve.
7. Cut last piece of rail to fit tightly against terminal post. Secure rail using a rail end and brace band or RT cap as was done on prior terminal posts.
STEP 6
HANGING FENCE FABRIC
1. Starting at a terminal post, unroll chain link fabric on the ground along the outside of the fence line to next post.
IMPORTANT NOTE: If linear footage between terminal posts is greater than 50ft (standard roll length of chain link fabric) splicing sections of fence fabric will be necessary.
See Figure 8 for splicing illustrations.
2. Slide tension bar through the first row of chain link.
3. Fasten evenly spaced tension bands already on post (see step 4) to the tension bar and fabric.
4. Secure in place with a 5/16″ x 1 1/4″ band bolt with heads facing the outside of the fence.
5. Walk along the fence fabric, standing it up against fence frame, eliminating slack as you go.
6. Loosely attach fabric to top rail with tie wires to hold it in place.
7. Separate enough fabric from roll to span the opening between fence posts.
8. It is not necessary to cut wire. (See Figure 8 for Removing Excess Fence Fabric)
STEP 7
STRETCHING FENCE FABRIC
1. Insert a tension bar approximately 3′ inside the unattached end of the fence fabric. (See Figure 9)
2. Hook fence finger to the bar.
3. Attach a “come-a-long” from the finger to the other terminal post.
4. Stretch fabric until tight, using the come-a-long.
5. A slight slack should be created when squeezing diamonds formed by the wire with your hands. Diamonds should not look distorted or overly stretched.
6. Insert tension bar at exact length needed to attach to terminal post.
7. Attach single tension bands from terminal post to tension bar using band bolts.
8. Once bands are securely attached to bar, carefully remove stretching bar/finger and come-a-long.
9. Fasten fabric securely to top rail and line post using tie wires spaced 24″ apart long the top rail and 12″ apart on each line post. (See Figure 10)
10. Securely tightegn nuts on all single brace and single tension bands.
STEP 8
HANGING GATES
IMPORTANT NOTE: Same installation procedure is used on both single walk and double drive gates (See Figure 11)
1. Install pin (male) hinges to gate post.
2. To prevent gate from being lifted off, top pin hinge should be installed with pin pointing down; bottom pin hinge with pin pointing up.
3. Install gate clamps (female) to gate.
4. Insert pin hinges into gate clamps – adjusting as needed to align top of gate with top of fence.
5. Add gate latch and position at convenient height.
6. Tighten all bolts securely.
Privacy?
Privacy is possible with chainlink. Slats can be added to add design, color and privacy. Contact Fence Supply Inc. or visit our web site www.fencesupplyinc.com to see our wide varity of Chainlink slats.
Commercial Chainlink Fence.
Commercial Applications can be installed the same as residential with a few exceptions.
- The post tyipically are larger in diameter. 3”-4” post might be used for your terminal post and 2 3/8” would serve as the line post. 1 5/8 top rail would be used.
- The gauge of the fence fabric will be thicker usally a 11ga or 9ga would be used
- Barb Arms can be added to support barb and/or razor wire along the top of your fence.
Installing Barb Arms
Barb Arms
Your corner, ends, and gate post all need to be set 12”-18” higher then the finished height of the fence. See fig ? Barb Arms will be used instead of line tops. Barb Arms come in 45 degree or in verticals. The Barb Arms also include hole that the top rail will run through.