Why the Foundation is the “Make or Break” of a Texas Fence
In North Texas, we don’t just have dirt; we have expansive Blackland clay. This soil acts like a sponge—swelling with moisture in the winter and shrinking during the hot summer months. If you set your posts like they do in other parts of the country, your fence will be leaning within two seasons.
To build a fence that stays perfectly upright for 20+ years, you must use 2-3/8″ galvanized steel posts and a specific setting technique. This guide walks you through the professional method for anchoring steel in clay.
1. Digging the “Texas-Tough” Post Hole
Standard post-hole diggers often struggle with dry Texas clay. We recommend renting a gas-powered auger for projects over 20 feet.
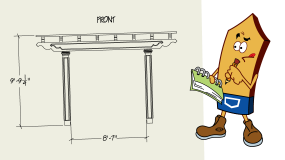
- The Depth Rule: For a 6-foot fence, your hole must be at least 24 inches deep. For an 8-foot fence, we strongly recommend 36 inches deep to counteract the wind load.
- The Width Rule: The hole should be roughly three times the diameter of the post. For a 2-3/8″ post, aim for a 8-inch to 10-inch diameter hole.
- The Bell Shape: At the bottom of the hole, try to “bell out” the base slightly with a manual digger. This creates an anchor shape that prevents the clay from “heaving” the concrete out of the ground during a wet spring.
2. The Drainage Secret: The Gravel Base
One of the most common causes of post failure is “pitting” at the very bottom of the post.
- The Step: Before placing your post, pour 2 to 3 inches of crushed gravel into the bottom of the hole.
- The Benefit: This allows water to drain away from the bottom of the steel pipe rather than sitting in a “cup” of concrete, significantly reducing the risk of underground corrosion over the decades.
3. Setting and Plumbing the Post
Once your gravel is in, place your 2-3/8″ galvanized steel post into the center of the hole.
- Check Your String Line: Ensure the post is roughly 1 inch away from your layout string (as discussed in our [Layout & String Line Guide]).
- Plumb It: Use a post level (a tool that straps onto the pipe) to ensure the post is perfectly vertical from both North-South and East-West angles.
- The Height: Ensure you have enough post above ground to support your top rail. For a 6-foot fence, you generally want the post to be about 68 inches above ground.
4. Pouring the Concrete (The “No Dry-Bag” Rule)
In the intense DFW heat, “dry bagging” (pouring dry mix and adding water on top) often leads to weak, brittle footings.
- The Pro Method: Mix your concrete in a wheelbarrow or mixer until it reaches a “thick peanut butter” consistency.
- The Pour: Fill the hole to within 2 inches of the surface.
- The “Mound”: Use your trowel to slope the top of the concrete away from the post (like a small volcano). This ensures rainwater runs away from the steel rather than pooling against it.
5. Critical Cure Time
The expansive clay of Kaufman and Collin Counties is constantly moving. You must give the concrete time to reach its full strength before you begin “hanging” the wood weight.
- Wait 24–48 Hours: Do not nail your rails or pickets to the posts until the concrete has fully cured.
- Wind Protection: If a major North Texas windstorm is predicted within 12 hours of your pour, use temporary wood braces to keep the posts plumb while they set.
Ready for the Rails?
Setting the posts is the hardest work you’ll do on your fence. Once your steel is anchored deep in that clay, the rest of the project is about aesthetics and assembly.