The Elegance of Steel: Installing Ornamental Iron
Ornamental iron (and its modern equivalent, galvanized steel) is the preferred choice for North Texas homeowners who want security and durability without obstructing a beautiful view. Whether you are fencing in a pool in Forney or an estate in Sunnyvale, ornamental iron offers a “forever” solution that thrives in the Texas sun.
Unlike wood fences, which are built board-by-board, ornamental iron is installed in pre-fabricated panels. This makes the layout and post-setting phases absolutely critical, as there is very little “room for error” once the concrete is dry.
Step 1: Precision Layout & Post Spacing
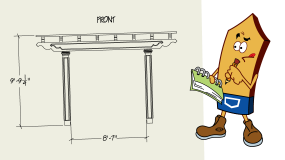
With wood, you can trim a rail to fit. With iron, the panels are fixed widths (typically 8 feet).
- The Math: You must set your posts so that the distance between them matches your panel width plus the thickness of the mounting brackets.
- The Practice: Most 8-foot ornamental panels require posts to be exactly 93.5 inches to 96 inches apart, depending on the manufacturer’s bracket system. Always measure your specific panels before digging.
Step 2: Setting the Posts
Ornamental iron is heavy and catches significant wind during North Texas storms.
- Post Size: Use 2-inch or 2.5-inch square steel posts.
- Depth: Holes should be 24 inches deep for 4-foot fences and 30–36 inches deep for 6-foot fences.
- The String Line: Your posts must be perfectly “in-line” and perfectly “plumb.” Any lean will prevent the panels from sliding into the brackets properly.
Step 3: Attaching the Mounting Brackets
Most modern ornamental systems (like Ameristar) use a “bracket and bolt” system rather than on-site welding.
- Bracket Types: You will use Universal Brackets for straight runs, Swivel Brackets for hills or slight curves, and Corner Brackets for 90 degree turns.
- Height: Measure from the ground up to ensure all your bottom brackets are at the same height. This ensures the “top line” of your fence remains level and professional.
Step 4: Hanging the Panels
Once the posts are set (and the concrete has cured for at least 24 hours), it’s time to hang the steel.
- Slide the Panel: Insert the rails of the panel into the brackets.
- Level the Top: Use a level on the top rail. If your yard slopes, you may need to “step” the panels (see Step 5).
- Secure: Use the provided self-tapping screws or carriage bolts to lock the panel into the bracket.
Step 5: Managing Slopes (Stepping vs. Racking)
North Texas terrain is rarely perfectly flat. You have two options for iron on a hill:
- Stepping: The panels remain perfectly level, creating a “stair-step” appearance. This is common for steep grades.
- Racking: Some high-quality ornamental panels are “rackable,” meaning the pickets can tilt to follow the angle of the ground. This keeps the gap at the bottom of the fence consistent, which is essential for Pool Code compliance.
Step 6: Touch-Up and Caps
Even the best installation can leave small scratches in the powder coating.
- Touch-Up Paint: Use a manufacturer-approved touch-up pen or spray to seal any exposed metal or screw heads. This prevents rust from starting.
- Post Caps: Tap on your decorative pyramid or ball caps to finish the look and keep rainwater out of the hollow posts.
Professional Tools for the Job
Installing iron is a “measure twice, cut once” project. We stock everything you need for a successful install:
- Pre-Fabricated 8-Foot Panels (Flat Top, Extended Picket, or Pressed Spear).
- Square Steel Posts & Heavy-Duty Brackets.
- Self-Closing Pool-Safe Gates & Latches.