Fence Supply Inc

Fence Supply Inc. - Wood, Iron, Chain-Link, PVC, Farm & Ranch Fencing, Iron Handrails, Posts, and Gates, PVC Handrails, Posts, and Gates; Gate Operators; Access Control; Kennels

(972) 226-0004

Contact     Hours     Map
  • My account
  • Cart
  • Wood
  • Iron
  • Vinyl
  • Chain Link
  • Gate Openers
  • Farm & Ranch
  • Shade Structures
  • Hardware & Tools

International Swimming Pool and Spa Code

admin · November 1, 2012 ·

The International Swimming Pool and Spa Code is a set of standard codes to ensure pool safety. According to the International Code Council’s website, it encompasses “the design, installation and inspection of… public swimming pools, public spas, permanently installed residential spas, above-ground/on-ground residential swimming pools, residential in-ground swimming pools, portable spas, aquatic recreational facilities, barriers for all residential pools and spas, water quality, and suction entrapment avoidance for these facilities.

While Fence Supply Inc. recommends reading through all of the specific rules and regulations in the International Swimming Pool and Spa Code, here are some of the important highlights to help get you started.

Fence Height and Clearances
The top of the fence should be at least 48 inches above the ground. The maximum clearance between the ground and the bottom of the fence is 2 inches for non-solid surfaces, like grass or gravel. For solid surfaces the maximum clearance is 4 inches.

Openings
Fence openings should be less than 4 inches.

Rails
All rails should be located on the pool side of the fence, making the outside of the fence unclimbable. When spacing your horizontal rails less than 45 inches from one another, spacing between vertical rails should not exceed 1.75 inches in width. When spacing your horizontal rails more than 45 inches from one another, spacing between vertical rails should not exceed 4 inches in width.

Chain-link
The maximum opening formed by a chain-link should be no more than 1.75 inches.

Clear Space
There should be a minimum of 36 inches of clear space around the exterior of the fence and any permanent structures.

Poolside fence setbacks

The pool side of the fence should be more than 20 inches away from the water’s edge.

Gates
All gates must comply with the above fence codes, as well as a few extra regulations. Gates must be self-closing and self-latching, equipped to accommodate a lock, and should open outward from the pool. The gate shouldn’t have openings larger than .5 inches within 18 inches of the gate’s release.

General Articles

5 Fencing Mistakes you Don’t Want to Make

admin · November 1, 2012 ·

Here are five common mistakes people make when choosing and building a fence for their property, and how you can avoid making them. Forewarned is forearmed!

Choosing the Wrong Kind of Fence
The process of putting up a fence can be an expensive process, so it always pays to do research and planning beforehand. The best place to start is with your city’s planning commission. Because zoning laws may affect your plan, check the regulations that pertain to fence construction in your area. Building a fence that doesn’t conform to local regulations can potentially mean having to remove your new fence.

That said, local regulations aren’t the only deciding factor when constructing a fence. Each fence style has its strengths and weaknesses, depending on your specific situation. Still, choosing a fencing system that works for you depends on what you are trying to achieve. Do you want to keep animals in, out, or both? Or, do you want a fence that just marks the boundaries of your property?

If you’re working with a certain animal, you need to know the habits of that animal. How big are they, how motivated are they to get in or out? For livestock, dairy cows and and beef cattle are the easiest to contain, with horses being a close second. Next are pigs, sheep, goats and game animals. Poultry can be especially challenging, because they can be small enough to slip under or fly over certain fences.

Even more difficult is keeping predatory animals out of your property, but simply knowing a bit about the habits of the animals can be extremely helpful. In areas prone to drought, wildlife is more likely to try to get in to your property for water. In areas without much rodent activity, a predator is more likely to come in after poultry. A fence that separates wildlife from their breeding grounds or migration trails can also offer incentive for animals to break in.

Determining the exact purpose of your fence, making sure your fence conforms to local regulations, and knowing the habits of the animals you want to keep in or out will help you determine the best fence for you.

Failing to Anchor Down Posts
A fence can only be as strong as its posts, making the posts a vitally important part of any fence. Because they are also one of the most expensive parts, it pays to take the time to choose and install fence posts carefully. A fence generally requires at least two types of post.

You will need solid posts at important spots like corners, rises, dips, and gates. These are called anchor posts, and give the fence stability and strength. These posts are generally larger and longer so they can be set further into the ground. Setting these posts incorrectly accounts for most fence failures. Anchor posts should be set deeply, properly braced, and set in concrete to ensure stability.

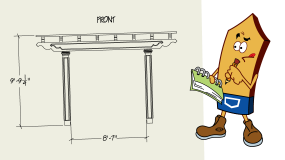
Line posts are the smaller posts between each anchor post. Because they’re under less stress, they don’t need to be as large or as strong as anchor posts. These posts’ prime function is to position the fence, so the taller the fence, the taller the line posts should be. Choosing the distance between line posts, which can be close as 8 inches or as far apart as 50 inches, depends on the type of fence you choose to install.

Both types of posts should be as straight as possible, because crooked posts place significant strain on the fencing material. You should also make sure that your line posts are set in a straight line between the anchor posts, to ensure stability and proper positioning.

Doing the job right means making sure anchor posts are strong, buried deep, set in concrete and braced properly. Line posts should be strong enough, tall enough, and set close enough so that your fence material is properly supported.

Improper Gate Size or Placement
Repositioning or moving gates is expensive, time-consuming and difficult, so you should take time to make sure you install them properly and in the best location. Gates should be placed in well-drained areas, out of the path of erosion. You should take foot traffic into consideration, and place gates where movement patterns are normal. Placing a gate in the corner of a livestock or garden fence encourages traffic to move along the fence line, instead of in the middle of the fenced-in space. A roadway gate should be set back far enough so that a vehicle can pull off the road while the gate is being opened.

Proper gate size is just as important. A gate designed for foot traffic should be large enough for a riding lawnmower, wheelbarrow, cart, or other wheeled tool. Four feet is usually an appropriate width. For livestock or large equipment, a 10-12 foot gate is more suitable. For vehicles, 14 feet should be wide enough, but larger farming equipment may increase your gate size. Just remember, if you have any doubts, it’s always better to have a gate that’s too big instead of too small.

A gate will get much more wear than the rest of your fence, so it’s vital to ensure it’s made from quality materials to keep the gate from sagging or warping. This also means that gate posts should be set with the same precautions and care as anchor posts.

Fencing Someone Else’s Property
When putting up a boundary fence, it is critical to know where your exact property line is, even if it means talking with a surveyor. Local restrictions can also dictate how close your fence can be built to your property line.

If you want the fence to be directly on your property line, your neighbor may be willing to share the cost and maintenance with you. You should get an agreement in writing that details the specifics. This will help guarantee the arrangement if a new neighbor moves in. In the event that an agreement can’t be reached, build your fence sufficiently inside your property line as to avoid intruding on your neighbor’s property.

Digging into Underground Utilities
Before digging in preparation for your new fence, it’s important to ensure that all underground utilities are properly marked at the surface. The depth of utility lines can vary from property to property, and each state has different regulations in place for digging. To keep from risking damage to an underground utility line, harming yourself, disrupting service, and/or incurring heavy fines, the best assurance is to call 811. While there are numerous call centers across the country you can call for underground utility information, “Call 811” is the most comprehensive and effective resource for anyone beginning a digging project. Simply dial 811 from anywhere in the country a few days prior to your digging project, and your call will be routed to your local call center. Detail your digging project to the operator, and the proper local utility companies will be notified about your intent to dig. Within a few days, they will send a locator to mark the locations of your underground utilities, so you can dig with peace of mind.

General Articles

“Squaring-up your fence” How to

admin · November 1, 2012 ·

Here’s how to make sure your fence is straight and square so it looks its best.

You will need to already have your fence or property line mapped out with tape or string. If you haven’t located your fence or property lines yet, click here to learn how.

When squaring up a fence, using the classic 3-4-5 rule is the most effective way to get an accurately squared corner.

Start in one corner of the fence layout. If the corner isn’t marked with a temporary stake, mark it. Using the temporary fence or property lines, measure three feet down the line to the left, and mark the spot with a stake. Start at the corner again, and now measure four feet down the line to the right, and mark the spot with another stake.

Starting at the left stake, measure straight across to the right stake. If the distance is exactly five feet, your corner is perfectly square.

If your triangle measures 3’x4’x5′, your lines are square!

For larger projects simply use a larger number combination making all three numbers divisible by 3-4-5, i.e., 21-28-35 (21÷3=7, 28÷4=7, and 35÷5=7).

Helpful Forms

Locating Property Lines before you build your fence

admin · November 1, 2012 ·

The best way to begin the process of locating and marking your property lines is to identify the corners of your property. The property corners are typically marked with metal identifiers by a surveyor team upon the purchase of a house or property.

If possible, contact your surveyor or your county records department to get a property plat map with the approximation of your property boundaries.

Start near where you think the corner is, according to your property map, and search for your property’s corner markers. If a marker has been driven below the surface, sometimes probing with a shovel will help to find it. If the marker is too deep, a metal detector should solve the problem. If the marker is invisible to the naked eye, use a temporary stake to mark the corners.

Once you have located and marked all the corners of your property, tie a string to your original stake and run the string to each corner marker, trailing the string behind you as you walk until you have the border of your property outlined by string.

You should now have a properly marked property line, and are ready to begin construction on your new fence.

Helpful Forms

Planning Your New Fence

admin · November 1, 2012 ·

The easiest way to begin laying your new fence is to identify where the corners will be. Hammer a stake securely into the ground at each corner. Once all of your corners are marked with temporary stakes, run mason’s line or string tightly from stake to stake, tying around each stake as you go. This will allow you to visualize your fence line’s layout, and address any problems in the layout plan.

Use these lines to mark the position of the first post. Then measure out on the line to mark the rest of the posts along the fence. Next locate, mark, and measure any planned openings, such as gates.

Now measure off your line and gate openings, and you should have an accurate estimate of the applicable materials you will need.

Helpful Forms

Call Before You Dig (Marking Utilities before digging for Fence Posts)

admin · November 1, 2012 ·

Before digging for your new fence, it’s vital to ensure that all underground utility facilities* are properly marked at the surface. Whether you’re a seasoned contractor or weekend do-it-yourself-er, risking damage** to an underground utility line while digging risks harm to yourself or those around you, disruption of service, and the potential for heavy fines and repair costs.

Due to the Underground Facility Damage Prevention and Safety Act, it is now mandatory for any person digging underground to contact an official notification center no less than 48 hours before digging.

While there are numerous call centers across the country that can manage your project, “Call 811” is the most comprehensive and effective resource for anyone beginning a digging project. Simply dial 811 from anywhere in the country a few days prior to your digging project, and your call will be routed to your local One Call Center. Detail your digging project to the operator, and the proper local utility companies will be notified about your intent to dig. Within a few days, they will send a locator to mark the locations of your underground facilities, ensuring the prevention of possible damage. Visit dial811.com for more information.

Click here for more information on the Underground Facility Damage Prevention and Safety Act passed in 1998.

—
*A utility facility is defined as, but not limited to, a line, cable, pipeline system, conduit, or structure that is located partially or totally underground and that is used to produce, store, convey, transmit, or distribute telecommunications, electricity, gas, water, sewage, steam, or liquids such as petroleum, petroleum products, or hazardous liquids.

**Damage is defined as, but not limited to, (A) the defacing, scraping, displacement, penetration, destruction, or partial or complete severance of an underground facility or of any protective coating, housing, or other protective device of an underground facility; (B) the weakening of structural or lateral support of an underground facility; or (C) the failure to properly replace the backfill covering an underground facility.

General Articles

Electric fence items and how to choose them

admin · October 24, 2012 ·

Quality Items = Quality Fence

Choosing the right items for an electric fence could be a gruesome endeavor especially if these items are of the same use, with similarly sounding names, and most sellers of these products who only anticipate gain and somehow forget to explain slight differences in these items.

Take for instance in setting-up electric fence for animal enclosure, you will encounter MR. Poly Wire, Mr. Poly Rope, and Mr. Poly Tape.  Never mind Mr. Steel and Mr. Aluminum since you are already long acquainted with them but, at least you should know the difference between the previous three Mr. Poly.

What would help you identify which item is which?  The main difference between these three is their sizes and these are as follows:

Poly wire – This is he thinnest of the three poly items.  Its diameter may range from 0.100” to 0.125”.

Poly rope – Thicker than the poly wire with diameter ranging from 0.125” to 1.000”.

Poly tape – This is the most visually identifiable from all three poly item since this is shaped like a tape unlike the first two which are rounded.  Poly tapes width ranges from 0.500” to 2.500”


Now that you know these simple vocabularies, which type of wire should you choose?  This depends on what type of enclosure you need and what type of animals you need to fence-in.  Larger and stronger animals would need stronger wire with higher charge.  Permanency of the fencing should also be taken into consideration in choosing the type of wire to use.


Below is a simple matrix that would help you decide:


Type

Visibility

Charge

Durability

Ideal Fencing Use

Poly wire Acceptable Low Will not rust. Temporary
Poly rope Good Average Will not rust. Temporary
Poly tape Excellent High Will not rust. Temporary/Semi-permanent
Steel wire Poor Very High High tensile. Semi-permanent/Permanent
Aluminum wire Poor Poor May sag. Permanent


Another important item one needs to choose carefully for electric fencing needs are the posts he would use.  There are various types of posts wood posts, rod posts, T-posts, fiberglass posts, step-in posts, pigtail posts and others.


Wood posts

Amongst all the available fences posts sold in the market, wood posts are the sturdiest of them all and the only one that would qualify as corner posts due to its resistance to strain.  Due to their effective value these post may come in at a slightly higher price but they are worth every penny you put in buying them.  Due to this, wood posts are seldom used as line post but they will properly serve this purpose and are most advisable if what you are planning to install is a permanent fence.


Aside from wood posts, there is no other type of fence post which is advisable for use as corner post due to the tension and stress carried by these areas.  For line posts however, you may consider other types which are more customized for such use.


Steel rod posts

These are durable post which can be used as line posts particularly for temporary fences due to easy installation.  This type of posts will not be able to carry too much strain so they are not recommended for corners.


Fiberglass rod posts

Fiberglass rods are similar to steel rod except for their composition.  These posts which are lighter than steel rods are also recommended only for use as line posts of temporary fences.


These rod type posts would need clams for attaching the wire to them so you also need to consider this in choosing them.


Step-in posts

Step-in posts are the best type of post for use as line posts.  These posts are made with large step-in flange for holding wires which makes it most recommended particularly when you will be using poly tape wires.  Other features of this type of posts are its reinforced ribs, bottom spikes, and color.  These features add strength, prevent rotation of the posts, and increase its visibility which makes it more appropriate for use.


Pigtail posts

A feature of this type of post which earned its name is the top loop which makes it look like a pig’s tail.  Most recommended for cell grazing or Managed Intensive Rotational Grazing (MIRG) due to its portable use and ease of installation.


T-posts

These posts are more durable than step-in posts thus, are more recommended for use in permanent fences.  These types of posts will last longer than other types due to its sturdy composition.


The wires and the posts are the most vital items for electric fencing.  There are other items that you may need to acquire such as the fence chargers which are also vital items, anchors, fence insulators, and accessories.


Fence chargers also needs careful deliberation and will be discussed separately.  Anchors, fence insulators, and accessories are items that you need to purchase according to your needs and are pretty much easier to choose.


The best thing that could help you in choosing the right items for your electric fence is to know what you need and which type of items would be suitable to be used as such.  You should also keep in mind that quality does not necessarily mean expensive.  There are affordable quality products you can find if you know where to look.

Electric Fence

Easy steps for installing your electric fence

admin · October 24, 2012 ·

For beginners, installing an electric fence is a little complicated and may cause harm if not done properly.  Here are a few steps that may help you in this task:


Step 1: Plan the job.

Great endeavors human have made were not carried-out through sheer talent and expertise.   Most of them succeeded due to carefully laid out plans.  So is your electric fence installation project.  Planning your electric fence will make the job go smoother, prevent accident, and save you a lot of time and more likely, money.  Now what should one plan about?


The things you need to know in planning the phase of your work is the type of materials to purchase, the kind of material to purchase, the amount of materials to purchase, the positioning of the post, the positioning of the wires, the installation of the wire chargers, and how and what accessories to add.   An important part of the planning phase is the fence layout which will guide you in the installation.


After laying out these plans you need to procure the tools and manpower need.


Step 2: Procure needed manpower, materials, and tools.

For manpower, it is advisable that you work with a two or three person team and make sure that at least one of you has knowledge regarding electrical jobs.  This will save you time and you will have a knowledgeable partner should electrical problems arise.


For acquiring materials, it is recommended that you find a supplier who specializes in electric fence products so you will be sure that the materials they will provide are of high quality.  Most of these specialized stores will have all the things you need so you will no longer spend time store hopping for items you need.  Another advantage of this is that you could ask advice from these specialized suppliers for the efficiency of your work and the adequateness of the materials you will purchase.


Since, you will be installing an electrical fence you will need tools that are customized for the job.  Having someone knowledgeable in electrical works will help you know which tools to use and how to use them in order to avoid damaging the materials.


Step 3: Pole down.

Now to proceed to the work proper, the first thing you should do is to install the fence posts.  This is a pretty easy job of dig and fill but you need to be accurate in your pole spacing.  In case your poles have flanges, you also need to be sure that line posts face in the same direct so you could have your wires laid out on a straight path.


You need to install corner posts first and line post next.  In installing corner posts, be sure that they have sturdy foundation in order to avoid uprooting since these posts will take higher amount of tension and stress.  For permanent fences, it would be beneficial to cement the foundation of your corner post.


In installing line posts, you need to accurately space them in order to properly carry the weight of the wires.  Be sure to measure, re-measure spaces between posts in order to be certain and refer to the fence layout you have made.  Having a spacing guide will help in the accuracy of your measurements.

You also need to ensure that posts flanges are facing the same position.


Step 4: Wire in.

Wirings are easy to install except for the knots and splice techniques that you need to apply.


While installing the wires around the fence, make sure that you properly insert them into the flanges of each line post for proper support.  In the absence of flanges, use wire clamps in attaching the wires to the posts.  Be sure that attachments to corner posts are sturdy and properly installed to withstand tension.


In connecting the wire, make use of the western union splice, the eight knot, or the reef knot.  The reef knot is most advisable in corner posts wire connections.  You must drill in a rod into the corner post and use it as the anchor where the center of reef knotted wires is placed.  Using connectors in joining electric wires will enhance electric flow and will ensure that the joints will be able to take a higher degree of strain.


When connecting poly products, you need to strip the end of the wires in order to maintain uninterrupted flow of electricity.  You should insulate these ends with an electrical tape once connected.


Step 5: Charge up, ground down.

In installing your electric chargers, make sure that they are boxed or placed in an area protected from the weather.  An ideal location is somewhere free from moisture.  This is with the exception of solar chargers which are needed to be placed outdoors where sunlight concentration is relatively high.  Nevertheless, you should always make sure that your chargers are elevated from the ground.


Connect the ground wire of your charger to ground rods.   Three properly spaced (8’ to 10’ apart) grounding rods would be considered as proper grounding.  Connect the ground wire to the rods through the ground rod clamp.  Then, bury the rod to the ground.  In doing this, make sure that there are not underground lines that are in contact or near you ground rods.


Finally, you need to connect the lead wire to your fence wires.  Install jumpers to distribute current to other electric wire levels in your fence.


Step 6: Accessorize.

The purpose of your electric fence is to enclose animals in and not injure anyone who comes into contact with them.  In order to prevent this, you need to accessorize your electric fences.


The most useful accessories are the warning devices.  You should install one or more warning devices in each side of your fence to warn anyone from touching the wires.  You may also use insulated clamps in order to prevent current from flowing into the post if these are positioned outside of the wires and are intended not to carry any current.


Lightings should also be installed around the fence in order to ensure visibility during night time.  For high tensile wires, strainer should be used to tighten them.  You may also need electric wire testers to test presence of electric current around the fence.  For storm prone areas, lightning diverters should be installed to prevent lighting from striking you fence and causing unwanted power surge.


Step 7: Final check.

A final check will be needed to ensure proper installation of your electric fence.  Check for the following as you tour around your fence:

  1. Test if electric current is distributed through-out the fence by using an electric wire tester.
  2. Make sure that there are no animal drinking vats near the fence.
  3. Look for other obstacles that may come near your fence such as tree branches, grass, and others.  These will impede electric current.


After such check, you will be confident enough that your fence would serve its purpose.  Now, you should never install and leave your fence as they are.  Don’t forget to do regular maintenance checks or have someone to do this job.

Electric Fence

Basic measurements needed in planning your electric fence

admin · October 24, 2012 ·

Installing an electric fence is an excellent way to contain your animals.  This may seem to be a simple job but, installing electric fences needs careful planning and proper execution.  In the planning phase of your fence installation, knowing the vital measurements needed is crucial to the job.  The basic measurements you need to know are the length of the fence, the height of the fence, the height of the grounding posts, the number of grounding posts, and the total length of the wire.

1. The length of the fence is easiest to obtain.  You just need to measure the perimeter of the area that needs enclosure less the length of the parts that needs no fencing (e.g. walls that form part of the enclosure).

2. The height of your fence has a directly proportional relationship to the height of the animals you wish to keep inside the fence and your assessment on their fence jumping and fence bumping capacities.  Taller animals with higher fence jumping tendencies and stronger fence bumping strengths need to be enclosed using a higher fence. 

3. The height of your posts is dependent on the height of your fence and can be computed using the simple formula below:

HoP = HoF + Sink + PA

Where “HoP” is the height of your posts, “HoF” is the height of your fence, “Sink” is the measurement of the part of your post you wish to sink to the ground, “PA” is the post allowance ranging from 2” to 4”.

4.      The number of posts depends on the length of the fence and the desired distance between each grounding post.  An advisable distance between two posts is 6’ to 10’.  Now, compute the number of grounding posts needed as follows:


GP = /(LoF / DP)/ + 1


Where “GP” is the number of grounding posts, “LoF” is the length of the fence, and “DP” is the distance between posts.  Only consider the absolute values in the division process and don’t forget that you need to add 1 for the end post.

  1. 5.      The length of the electric wire depends on the length of the fence and the number of wire levels you need.  You will get the total wire length (TWL) by multiplying the length of the fence (LoF) by the number of wire levels (WLv) and adding an allowance (WA) of 6’ or more depending on your estimate (this allowance will be used in connecting your electric wire to its charger).


A sample computation for the total length of electric wire you need – assuming that your fence length is 90’ and you need 4 wire levels and decided on a 12’ allowance – is as follows:

TWL = (LoF * WLv) + WA

TWL = (90’ * 4) + 12’

TWL = 360’ + 12’

TWL = 372’


Obtaining these measurements, no matter how basic they may seem, is crucial to the success of your electric fence installation.  And you need to be prudent in doing these simple computations.  Remember even the genius may have the ability to compute the complex but they usually flunk the basics.

Electric Fence

Equine Electric Fence Enclosures – Keep your horses in without breaking them

admin · October 24, 2012 ·

Power has always been associated with horses due to their muscular build and the strength of their limbs.  This mindset may convince you that horses need harsher treatment in order to contain them.  As what most would say, “To tame a horse, you need to break them”.


You may be thinking of the following options to avoid keep your horses from visiting your neighbors:

–          Buy and use barbed wires as fences to restrict these powerful creatures.

–          Keep them tied.

–          Hold them in a barn.


The first option would most likely literally break your horses and cause unwanted injuries.  The second and third options would restrict your horses and prevent them from maintaining a part of their wild side which is considered by most as beneficial to their growth.


Horses are sociable creatures of the wild.  They need to run with the herd.  But as their owner, you need to keep them from straying away.  While causing harm to them is not an option.


How would you solve this problem?

The answer is simple.

Install an electric fence.


Contrary to the power they possess, horses are gentle in nature.  When feeling threatened, their first instinct is to flee rather than to attack.  They are also easy to train and can retain memory of certain things that are repeatedly introduced to them.  These characteristics of the equine herd make an electric fence the ideal enclosure for these animals.


Poly products are the most advisable electric fence wire to use for keeping you horses at bay.  These colored wires will help in training your horses to keep away from the fence since they have a more solid visual impact.  These types of wires also conduct lesser amount of current which is enough to convince a horse to keep away but not too much to make it run in panic up to the other side of the enclosure or to retaliate against the fence.


Permanent enclosures:

For permanent enclosures for horses, one may use wood in the bottom part of the fence with a height of 3’ to 4’ and add two layers of poly tape wires (or other types of poly products) on the upper portion.  Painting the wooden fence white is recommended for this type of fence.  This would strengthen your enclosure and also add to the visual weight of the electric fence.


In choosing the electric fence charger, pick the ones with low impedance.  A charger having low impedance will distribute only a small amount of current around the wires.  This will be enough to make the horses feel an uncomfortable shock when they hit the fence without causing panic to them.


Temporary enclosure:

Step-in posts and poly tape wires are most advisable for use in temporary fences for horses.  These products will provide ease in the installation of your temporary enclosure and will help in training your horses to stay within.  It would be advisable to keep your horses tied until they become accustomed to the effect of the temporary enclosure.  If you have a permanent enclosure and are maintaining temporary fences only for grazing purposes, use the same color of wires for the permanent enclosure and the temporary fence.  This will help in the conditioning of these animals.


Make sure to also choose a charger with low impedance for your portable electric fences.  Solar chargers are most recommended for this type of enclosure.  This will prevent running out of power and losing your horses due to un-charged fence wires.


Electric fences will be very beneficial to maintaining a herd of horses since these animals can be trained and conditioned to stay within the enclosure.  You don’t need to break them just to keep them in.

Electric Fence

  • « Previous Page
  • 1
  • 2
  • 3

Product categories

  • Wood
  • Iron
  • Vinyl
  • Chain Link
  • Hardware & Tools
  • Farm & Ranch
  • Gate Openers
  • Shade Structures

Learn Center

We have acquired a lot of knowledge over the years.

Drawing Center

Plan, elevation, and detail drawings to help you get

Photo Gallery

Check out these beautiful finished projects built with

Tour

Get a good look at our storefront, warehouse, and yard.

Shop

  • Wood
  • Iron
  • Vinyl
  • Chain Link


  • Gate Openers
  • Farm & Ranch
  • Shade Structures
  • Hardware & Tools

More Info

  • Privacy Policy
  • Terms and Conditions of Sale
  • Installation Services
  • Contact Us

About Us

  • Our Story
  • Our Team
  • Go Green Initiative
  • Careers

Fence Supply Inc.

435 US Highway 80 E
Sunnyvale, TX 75182


Phone: (972) 226-0004
Toll Free: (888) 201-2564
Fax: (972) 226-0777


Contact Us

About | Contact | Privacy & Terms

© 1996–2025 Fence Supply Inc. | All rights reserved.
Fence Supply Inc. - Wood, Iron, Chain-Link, PVC, Farm & Ranch Fencing, Iron Handrails, Posts, and Gates, PVC Handrails, Posts, and Gates; Gate Operators; Access Control; Kennels
Picketman™ is a trademark of Fence Supply Inc.